How to Vibe Code in 7 Steps: A Beginner’s Guide [2026]


How to vibe code is simpler than it sounds: if you can describe what you want in plain English, you can ship working software. But success depends on how you prompt, what you review, and when you stop relying on AI alone. Before launching anything you vibe coded, make your AI-built app investor-ready.
Updated June 2026: the 7-step workflow was reviewed for 2026, a reference source was added, and a formatting issue in the example log was fixed.
Key takeaways
- You do not need to write code, but you do need to prompt, review, and test deliberately if you want the app to survive contact with users.
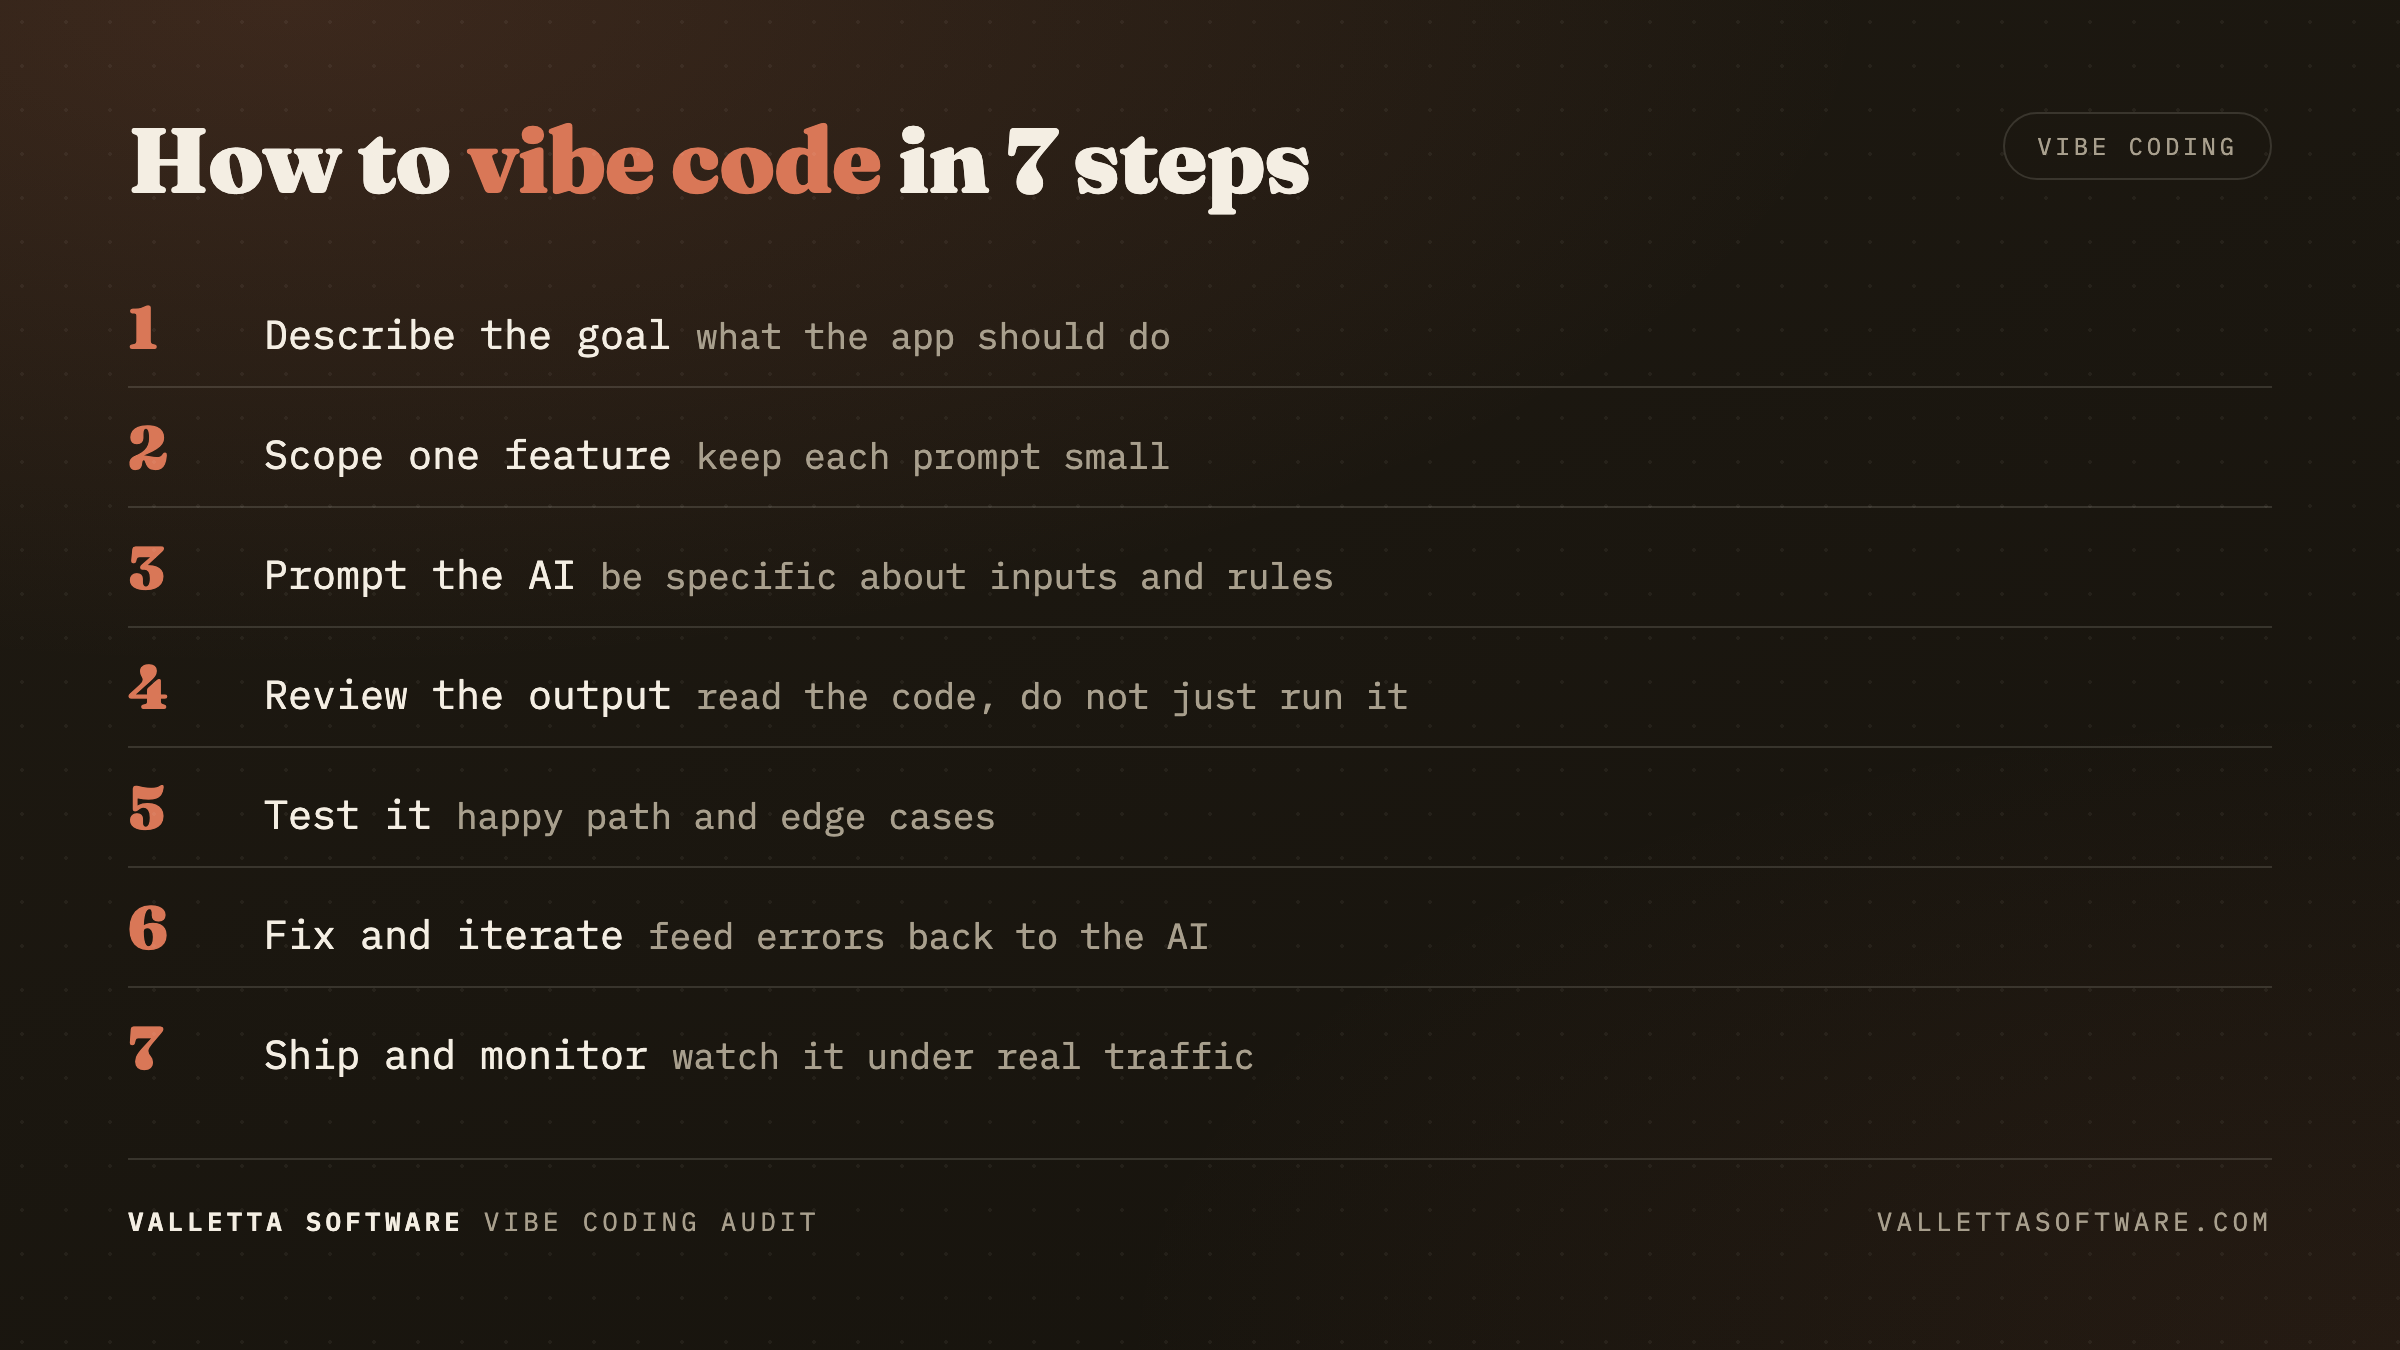
- The seven steps: scope, prompt, generate, review, test, harden, ship.
- The single biggest mistake is accepting AI output without reading it line by line.
- Stop vibe coding alone when the app touches money, personal data, or external customers; bring in a human reviewer.
For the broader vibe coding playbook, read here.
What Is Vibe Coding?
Vibe coding means building software by describing what you want in natural language and letting AI generate the code, but real success depends on structured prompting, disciplined review, proper testing, and knowing when to bring in human engineering review.
What Matters Most
- If you can describe what you want clearly, you can build software, but precision matters.
- One feature per prompt gets better results than broad instructions.
- Always review and test AI-generated code before shipping.
- Document what the AI builds to stay in control of the project.
- Get senior engineering review before launch to reduce security and quality risks.
What This Guide Covers
If you can describe what you want in plain English, you can ship working software. That's the premise of vibe coding, and it's genuinely true, with one asterisk most tutorials skip: how you describe it, what you check before you accept it, and when you stop relying on the AI alone determines whether you've built a product or a time bomb.
This is a practical guide on how to vibe code for non-engineers. No programming prerequisites. No theory. Seven concrete steps, the specific mistakes to avoid at each one, and a clear signal for when to stop vibe coding on your own and bring in human engineering review.
If you haven't yet, understand what vibe coding is before you start , this guide assumes you know the basics and want the workflow.
Who This Guide Is For
Vibe coding for beginners tends to fail at the same places regardless of background. The failure modes are universal; the workflow that prevents them is also universal.
This guide works whether you're:
- A founder validating a business idea
- A product manager building a functional prototype
- A designer extending Figma mockups into live apps
- A domain expert (lawyer, doctor, consultant) building tools for your own practice
- A student learning to ship software without a CS degree
What you need is the ability to read (not write) code critically, a willingness to test your own work, and the judgment to know when "good enough" actually isn't.
How to Vibe Code, Step by Step
The workflow below is tool-agnostic, it works with Cursor, Lovable, Bolt.new, Replit Agent, v0, or any other AI app builder. Specific tool-configuration details are called out where they matter.
Step 1 – Choose Your Tool Based on What You're Building
Different tools work better for different people. If you are technical, Cursor may feel stronger. If you are a beginner, Lovable or Bolt may be easier. Pick the tool based on your skill level, not hype.
Before you type a single prompt, match the tool to the job. Tool mismatch is responsible for a huge share of bad vibe coding outcomes.
- Full-stack app from scratch? Use Lovable AI, Bolt.new, or Replit Agent. These vibe coding platforms generate front-end, back-end, and database together.
- Extending an existing codebase? Use Cursor or Claude Code. Cursor vibe coding works because it reads your whole repository before making changes.
- Just a UI component or landing page? Use v0 by Vercel. It's narrower than the others and better at what it does.
- Automation script or data task? Use ChatGPT, Claude, or Google AI Studio. You don't need an app builder for a one-time script.
Configuration tip: On any app-gen platform, turn on automatic git export on day one. The ability to pull your code out of the hosted environment is your insurance against vendor lock-in.
Step 2 – Scope Tightly Before You Prompt
The single biggest mistake in vibe coding for beginners is prompting too broadly. "Build me a SaaS for freelancers to manage invoices" produces incoherent output from every tool on the market. "Build a page that lists invoices from a Supabase table, with columns for client, amount, due date, and status" produces exactly what you asked for.
The rule: one feature, one clear input, one clear output, one prompt.
Write down the slice before you open the tool:
- What screen or flow am I building right now?
- What data does it need?
- What does the user do on it?
- What does the user see after?
If you can't answer these in two sentences each, the slice is too big. Break it down further.
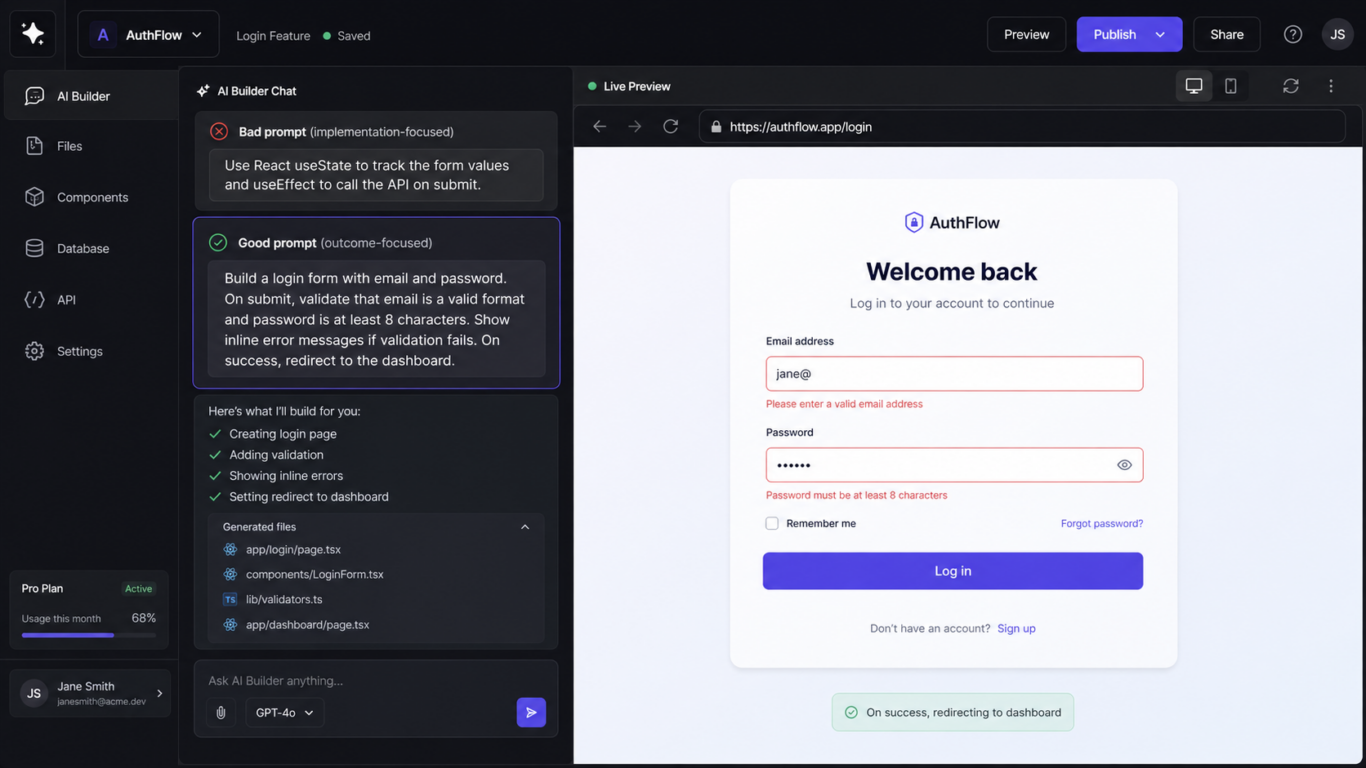
Step 3 – Prompt in Outcomes, Not Implementations
Tell the AI what result you want, not how to code it. Example: “Create a clean login page with forgot-password flow” is better than “Use React state and API calls.” Focus on outcomes users care about.
Bad prompt: "Use React useState to track the form values and useEffect to call the API on submit."
Good prompt: "Build a login form with email and password. On submit, validate that email is a valid format and password is at least 8 characters. Show inline error messages if validation fails. On success, redirect to the dashboard."
The difference: the first prompt tells the AI how to do something; the second tells it what you want to happen. AI tools are consistently better at choosing implementations than humans are, if you give them a clear outcome.
Prompt template that works across every tool:
GOAL: [what the user should be able to do]
INPUT: [what data or actions come into this feature]
OUTPUT: [what the user sees or what gets saved]
CONSTRAINTS: [anything that must not happen, e.g. "never show raw error messages to the user"]
Step 4 – Review Every Change Before You Accept It
This is the step where "vibe coding step by step" stops being a casual activity and becomes real work. Never click accept automatically. Read what changed. Check if it broke styling, logic, or security. If you don’t understand the update, ask the AI to explain the change in plain English first.
- Read the diff.
- Check the file list.
- Watch for deleted code.
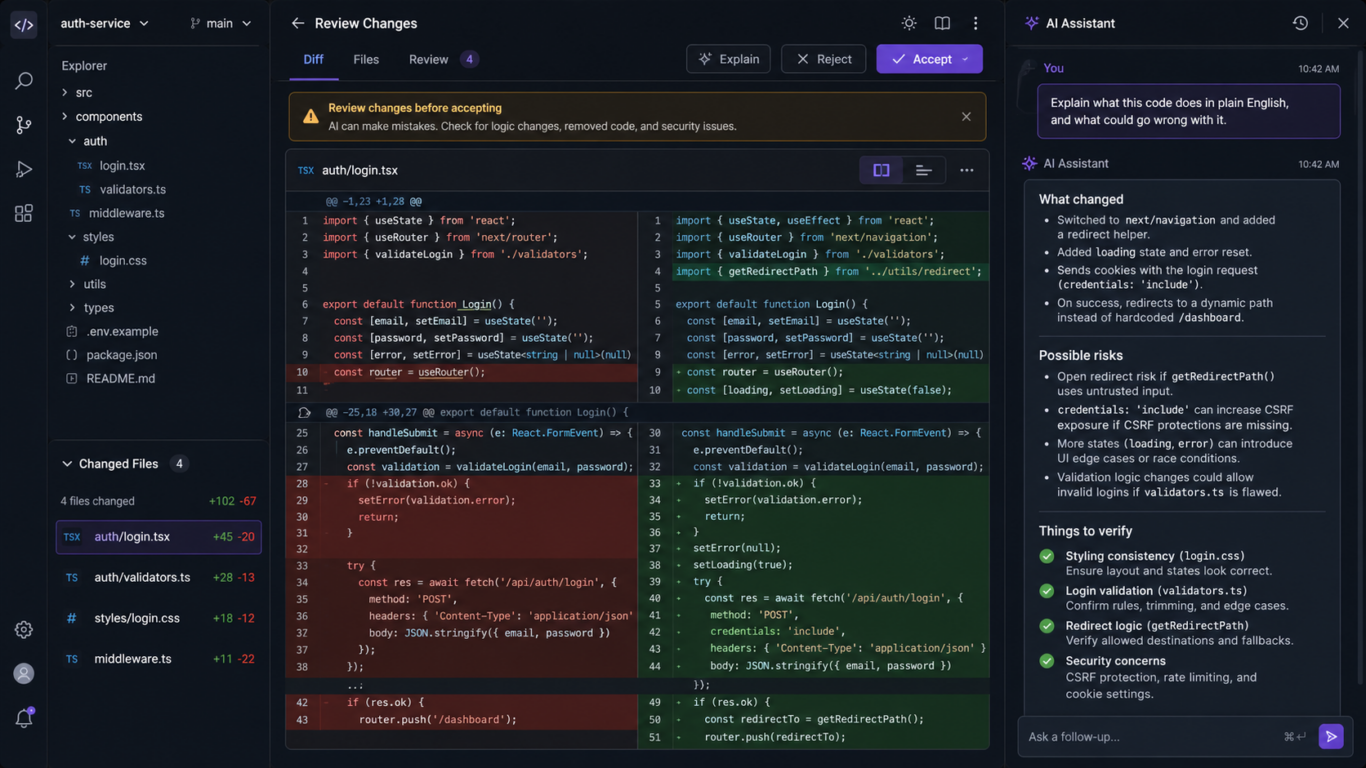
If you can't tell what a change does from reading it, paste it back into the chat and ask: "Explain what this code does in plain English, and what could go wrong with it."
Step 5 – Test Against Reality, Not the Demo
After every major change, test the main flows. Check sign-up, login, forms, mobile layout, and navigation. Small issues become bigger problems if ignored for too long.
- Empty input
- Malformed input
- Unauthenticated access
- The "back button" test
- Mobile view
This is the cheapest testing you will ever do. It catches 80% of the bugs a real QA pass would find.
Step 6 – Document What the AI Built
Ask the AI to use clear file names, reusable components, and consistent structure. Messy projects become difficult to maintain. Good organization saves time when features grow later. Vibe coding best practices converge on a single underrated habit: maintain a human-readable record of what the AI produced.
2026-04-12: Login flow
- Built with Lovable
- Uses Supabase auth
- Password reset is NOT implemented yet
- Rate limiting: none (needs adding before go-live)
Step 7 – Before Go-Live, Get a Senior Engineer to Review What the AI Built
Before going live, have an experienced developer review security, performance, scalability, and architecture. AI tools help build quickly, but expert review helps avoid expensive mistakes after launch.
AI-generated code routinely ships with:
- SQL injection vulnerabilities
- Missing authentication
- Hardcoded secrets
- Insecure direct object references
- Outdated dependencies
The final step before shipping: get a senior engineer to review what the AI built. (See the Vibe Coding Audit for scope and pricing.)
Vibe Coding Best Practices in One Glance
- Start with clear goals
- Prompt outcomes, not code details
- Review every AI change
- Keep files organized
- Test after each update
- Protect user data
- Get expert review before launch
Common Mistakes Beginners Make
- When AI fixes bugs without explanation, you may create new hidden problems. Always ask why the bug happened first.
- The first answer is often average. Ask AI to improve, simplify, or explain alternatives.
- Starting without structure creates messy projects. Define pages, features, and goals first.
- Never assume AI writes secure code automatically. Review auth, forms, and data handling carefully.
- Test basic flows before launch. Broken signup or checkout can kill trust fast.
FAQ
What does it mean to vibe code?
To vibe code is to build software by describing what you want in plain English and letting an AI tool, Cursor, Lovable, Bolt.new, Replit Agent, or similar, write the code. The developer steers with prompts; the model handles the implementation.
How do I start vibe coding as a beginner?
Pick one tool that matches the output you need (Lovable or Bolt.new for full apps, Cursor for editing existing code), scope your first project tightly, a single page, a single feature, and prompt in outcomes rather than implementations. Build, test, and ship one small thing before moving to a larger project.
What are the best vibe coding practices?
The five practices that consistently separate working vibe-coded apps from broken ones: scope each prompt to one feature, review every diff before accepting it, test with messy real-world input and not just happy paths, document what the AI built, and get a senior-engineer code review before any user touches the app.
Is vibe coding safe for non-engineers?
It is safe for prototyping, internal tools, and personal projects. It is not safe, without a code review, for anything that handles user data, payments, or regulated information. The risk is not the AI; it is shipping code that no one has read.
Can you really build an app without knowing how to code?
Yes, Lovable, Bolt.new, and Replit Agent let a non-engineer ship a working full-stack app in a single afternoon. The catch is that shipping that app safely to real users still requires someone with engineering judgment to review what the AI built before launch.
What is the difference between vibe coding and no-code tools?
No-code platforms (Bubble, Webflow, Airtable) keep you inside a visual editor and a fixed component model. Vibe coding produces actual source code in a normal stack (React, Next.js, Postgres) that you can read, fork, and self-host. More flexibility, more surface area for bugs.
The Bottom Line
Learning how to vibe code is less about mastering tools and more about building the right habits: tight scoping, outcome-based prompting, disciplined review, honest testing, and knowing when you've reached the edge of what you can ship safely on your own.
Ready to ship, but want to know what the AI missed first? Get a senior engineer to review what the AI built.
Free Vibe Coding Checklist
Want the 7-step vibe coding checklist as a printable PDF? Contact us and we’ll send it free.
Frequently asked questions
- How do I start vibe coding?
- Pick a tool (Cursor, Lovable, Bolt.new or v0), write a clear product brief, prompt for the smallest viable scaffold, then iterate. Always read the generated code before moving on.
- What should I check after the AI generates the code?
- Auth, secrets, database rules, input validation, and the deployment config. Those five layers cover most of the production risks.
- How much does vibe coding speed up development?
- For greenfield prototypes, vibe coding is typically 5 to 10 times faster than handwritten code. For production-grade systems, the speedup is smaller because the review and remediation steps catch up.
- What mistakes do beginners make?
- Trusting the first output, skipping the security review, deploying without environment separation, and storing secrets directly in the code.
- When should I bring in a senior engineer?
- Before launch, before fundraising, and before any data-sensitive feature. A vibe coding audit gives a structured second opinion in under a week.
Further Reading
Before You Launch What You Vibe Coded
The Vibe Coding Audit reviews your code for security, architecture and scalability. Senior-engineer review, fixed fee from $199.